I built this over the summer of 2008, with the help of my friend Jesse Boyes.
It took about half a year to figure out how to do this, and then about a week
to actually get it done.
A few people have been asking for detailed instructions so they can clone it,
so here they are. Make sure you read this like 5 times before starting. This is
not trivial, and if you mess it up (or if I messed up the steps) you will
be screwed. Make sure you understand the procedure and why each step is done
before you begin. Good luck and send me photos if you do clone it.
-
19 Light bulbs.
-
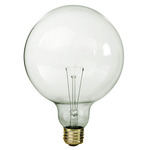
I used G40 clear 25 watt 5 inch bulbs. Thats a total of 475 watts. If you
have circuit breaker for it, you can try 40 watt or 60 watt, but remember,
that is 760 watts total or 1140 watts.
I find the chandelier looks awesome with the 25 watt, but its not something
that really you'd use to light up a room.
You can see an example of the bulbs here: https://www.1000bulbs.com/category/g40-decorative-globe-light-bulbs/.
-
A lot of electrical wire, heavy duty, like the type they make extension
cords out of.
-
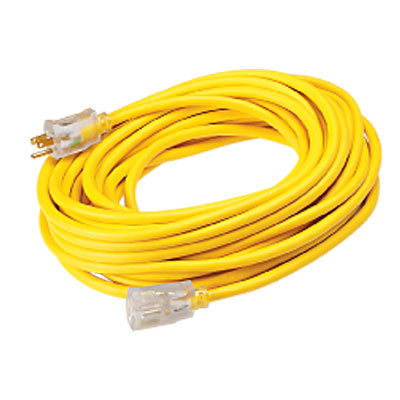
The above is what it should look like, but I got mine black and obviously
without the ends. I needed about 200 feet.
You will want to figure out approximately how low you want it to
hang, and then measure that distance to the ceiling, add a few inches, and
multiply by 19.
-
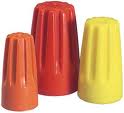
19 bulb sockets + caps
-
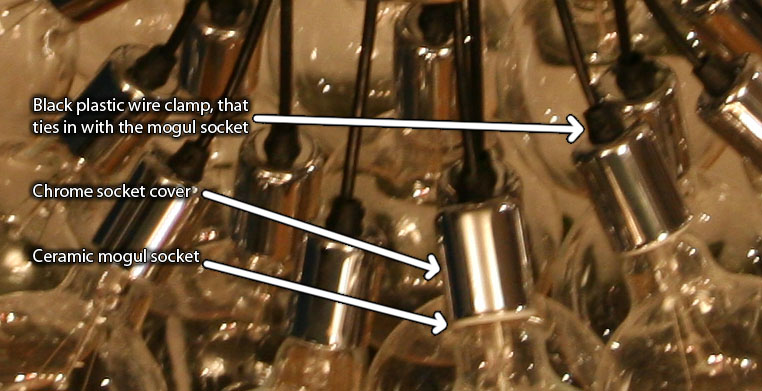
You will be attaching all the electrical wire to these sockets, so get
Glazed Ceramic Mogul Sockets (google it). Something like this:
http://www.fruitridgetools.com/storefrontprofiles/DeluxeSFItemDetail.aspx?sfid=136763&i=174452376&c=7745
I picked up mine for about $3 each at a local lighting shop here in NYC.
You can get them unglazed too, but I think the glazed ones look better.
Even with glazing, these things are pretty ugly, so you will want to get
some chrome covers for them. Now, these covers are very hard to find
online, because I'm not sure what they are called. I got all of this stuff
from the various lighting stores in SOHO/Canal St area in NYC, and picked
out the sockets, covers, and wire clamps that all fit and looked good
together. Let me show you a close-up with the pieces I got, and you can try
to find something similar.
-
Cake ring
-
This is used to stop the wires from spreading out into a cone, which makes
the Chandelier look like an xmas tree.
8"x2" is what I got from a local cooking supplies store. Something like this:
http://cooksdream.com/store/s-s-entremet-ring.html
-
Decorative wine/champagne cooler
-
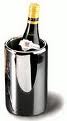
I picked up mine at Crate & Barrel, but you can get one anywhere. Make it pretty, simple, and ideally with no taper, lip or feet.
The one I got was chrome, very shiny, but also had
texture of hammered metal, which helps hide any imperfections you may add
during the building. I also think it looks better than these. Hunt for
this, as its the only piece that isn't 'generic' for this project. You can search online for 'double walled wine cooler' (or chiller, or champagne)
Here are some examples:
http://www.williams-sonoma.com/products/8399867/
http://www.amazon.com/Bernardo-Double-Stainless-Champagne-Cooler/dp/B0039KOUNG/
http://www.rushgideon.com/ProductDetails.asp?ProductCode=125-5626
http://rapidswholesale.com/Merchant2/merchant.mvc?Product_Code=7V195&Screen=PROD
-
3 screws + screw caps
-
These are to hold up the chandelier, and the caps are so you don't have
ugly screws showing.
I got mine from Pro-Dec.com.
I'd recommend getting some 8/8 and 12/12 just to be sure. they have some
screws that work well with them as well. Don't forget the base washers too.
It's all on that site.
You will want to get screws that are about 5-10mm longer than the thickness
of the wall of the wine cooler. Don't get them much longer, and don't get
them any shorter.
-
A circular piece of wood, that will fit snuggly inside the wine cooler.
-
This is used to hold up the lighting
Paint it black, and drill 19 holes into it. 1 in the center, 6 more evenly
around that hold, and 12 more around those. this will help guide your wires
so they have nice spread and don't look like jumbled mess. The holes should
be the diameter of the wire. It should be a snug fit.
-
2 wire nuts
-
You know, these things:
-
Soldering iron + solder
-
Self explanatory.
-
Materials to mount a fixture to your existing light junction box.
-
This will depend on the junction box you have, so read everything on this
page in detail to figure out how this all works. You should be able to get
the right stuff if you understand everything.
Procedure
- Cut off approx 2, 1 foot long lengths of wire, and strip the ends. About 1
inch on both ends for internal wires, and 6mm of exposed core.
- Cut the remaining wire into 19 equal size lengths and strip both ends.
give yourself about 2 inches for the internal wires on one end, and about 1
inch on the other end. You only need about 6mm of exposed core wiring.
- Attach all ends of the 19 wires to the 19 sockets, by the 1 inch side.
Before doing this however, I recommend putting the wire through the wire
clamp and the socket cover.
- Cover the socket with the cover, and screw the wire clamp into the
socket.
- Take all 19 wires and hang them from someplace high for a few days.
This will stretch out the wires a bit and also straighten out any curves.
the weight from the sockets will help with this, and also, if the wire
needed to stretch a bit, it will do so. This will prevent uneven bulbs in
the future.
- Take the other end of the 19 wires, and thread them through the
circular wood piece with 19 holes. Make sure the outer wire is fully
through the holes.
- Take the 2 leads from all 19 wires and twist the hots together, and the
colds together. This will be a total mess, but because it'll be in the wine
cooler, behind the black wood disc, you will not see any of it. Luckily you
have 2 inches of wire to mess with here. I suggest soldering the exposed
hots and colds into 2 bunches, instead of only twisting them.
- Take one of the 1 foot sections from the first step, and attach one end
of it into the soldered ends. Wrap up everything in electrical tape to
avoid a future short.
- This is really important: You have to make sure all the lengths of the
wires are the same length on the side of the wood that does not have the
soldering. If you don't do this, all your light bulbs will be uneven. Make
sure you make all the wires not tangled when you do this, or else the
lengths will be wrong.
- Attach the second 1 foot section to your junction box.
- Mount the wine cooler to the junction box. The wine cooler will
obviously be upside down. My box had the wire from the previous step, and
two screw holes. I drilled a hole about 1cm wide in the center of the
bottom of the wine cooler, and 2 smaller holes around it to line up with
the holes in the junction box. Then I ran the wire from the previous step
through the larger holes and put screws and washers inside the wine cooler
and mounted it to the junction box.
- Take the wood, soldered mess of cables, and single wire, and raise it
to the wine cooler. Using the wire nuts, attach the wire coming out of the
cooler from the previous step to the single 1 foot wire coming out of the
mess of soldered wires.
- Stuff the wire nuts, 2 1 foot sections of wire, all the soldered mess
and the wooden disc, into the wine cooler.
- Note how far it will go up the cooler, and drill 3 holes in the wall of
the cooler about 1cm lower (toward the floor) around the cooler. The holes
should be smaller than the screws you got. Fit your screw cap washers on
the screws and screw them into the 3 holes. Then slowly release your wires.
The screws should hold up the wood, and thusly all the wires!
- Put your caps on the screws, so it looks nice.
- Straighten out all your wires, so none are crossing each other. This is
tedious, but possible because you made 19 nicely arranged holes in the
wood.
- Thread all the wires and sockets through the cake ring.
- Attach bulbs to the sockets, and then repeat the straightening process.
This will be even more tedious because you will want to be very gentle, so
that you don't break the bulbs.
Things to note
- It's very hard to get the cables the same length, so double and triple
check before soldering.
- 2 people are absolutely required to do the last few steps, and possibly even 3. I did
it with 2 and it was hard.
- Make sure you don't overload your circuit breaker. using 19 100 watt
bulbs will be awesomely bright, but if you share your circuit with your
microwave oven it'll also probably flip you breaker every time you turn it
on.
- Get a light dimmer rated for the right wattage. The chandelier doesn't
put out much light at low power, but it looks really nice.


